

How To Set A Static Ip Linux
- Using ifconfig (deprecated)
- Using ip and netplan (modern)
The ip command is replacing the ifconfig command.
People often forget the process for assigning an IP address (static or dynamic) from the Linux command line. Most actually feel too intimidated by the process to commit it to memory, but it's actually very simple.
Here's how to get networking all the way up in a matter of seconds using just a few commands.
Using ifconfig
It's sad for us UNIX/Linux nerds, but using ifconfig is now the "old" way of doing things.
1. Set Your IP Address
ifconfig eth0 192.168.1.5 netmask 255.255.255.0 up
2. Set Your Default Gateway
route add default gw 192.168.1.1
3. Set Your DNS Server
Yes, 1.1.1.1 is a real DNS resolver by CloudFlare.
echo "nameserver 1.1.1.1" > /etc/resolv.conf
Assuming you have valid addresses for yourself and your gateway (and you have a clear path to the Interweb) you're all set. Test by pinging someone.
ping google.com
If you're using an older Linux system, that's all you have to do. If you're on a newer system, read on.
Using ip and netplan
You should start learning ip now, since it's about to become common everywhere.
Since ifconfig is being phased out, it's time to get used to the new system. By default, Ubuntu 18.04 doesn't use ifconfig anymore, and instead uses the new commands, ip and netplan.
Show your IP using ip
ip addr show
Bring an interface up or down using ip
ip link set eth1 up
ip link set eth1 down
Showing your routing using ip
ip route show
Editing your networking info
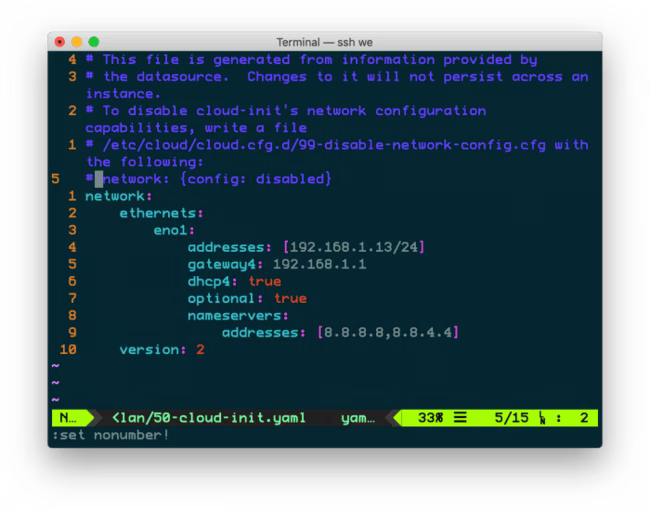
For Ubuntu, here's the replacement for editing /etc/networking/* in the old system. The whole system now uses YAML configuration files under /etc/netplan, and then the netplan command applies those configurations to the system.
The * represents the file you find there in the directory.
vi /etc/netplan/ *.yaml
network: ethernets: eno1: addresses: [192.168.1.13/24] gateway4: 192.168.1.1 dhcp4: true optional: true nameservers: addresses: [8.8.8.8,8.8.4.4] version: 2
And then to apply the configuration, you run:
netplan apply
So now—whether you're running an older system or a new one—you should now have a static IP address!
Permanence
And finally, here's how to make the change permanent (static) in various environments.
- Ubuntu
- CentOS
- Debian
- Gentoo
- AWS


Written By Daniel Miessler
Daniel Miessler is a cybersecurity leader, writer, and founder of Unsupervised Learning. He writes about security, tech, and society and has been featured in the New York Times, WSJ, and the BBC.
![]()
Join the Unsupervised Learning Community
The premier networking community for smart and curious people interested in security, technology, and society.
Every Monday morning I condense 20+ hours of content and analysis into a concise summary—and send it to around 50,000 people…
Weekly Newsletter (vs. Bi-Monthly)
Unabridged Podcast Feed Access
Show Archive Access
Concise Book Summaries
Exclusive Member-Only Content
Access to the UL Slack Community
Access to the Book Club
Essays, tutorials, and podcasts
Every other newsletter
Subscribe
How To Set A Static Ip Linux
Source: https://danielmiessler.com/study/manually-set-ip-linux/
Posted by: sumnerfecied1981.blogspot.com
0 Response to "How To Set A Static Ip Linux"
Post a Comment